


So you want a photo book, but aren’t sure where to start? Don’t worry! Follow the steps below and you’ll have a beautifully printed book on your doorstep in no time.
1. Choose your book style
Pinhole Press’s high-quality photo albums are the choice book for many professional photographers, but you don’t have to be a pro to create one. All Pinhole Press custom photo books are handcrafted in the USA and come with a 100% smile guarantee.

Softcover Photo Books
Softcover photo books feature a layflat binding with a rigid cover. The Portrait, Square, and Landscape softcover books hold up to 50 pages, while the Petite and Itty Bitty softcover books hold up to 20 pages. The cover features a luster photo paper and the inner pages are printed on matte paper with a smooth finish.
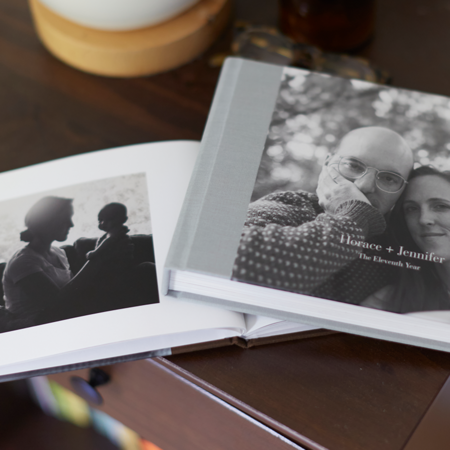
Hardcover Photo Books
Hardcover photo books are available in four different sizes and orientations. Each hardcover photo book features a layflat binding wrapped by a premium linen cloth and one special cover photo. The layflat binding allows for your photos to print seamlessly across the page. Select from 10 elegant cloth colors for your binding. Pinhole Press hardcover photo books hold up to 90 pages of photos printed on water repellant Luster photographic paper.
Custom Board Books
Board Books board books are available in a variety of themes and were designed specifically for little hands. Board Book pages are thick, rigid and durable with a glossy finish and rounded corners. Board books with illustrated themes hold a varying number of fixed pages. ABC board books hold 26 pages, one for each letter. All other photo board books hold a minimum of 20 pages and a maximum of 40 pages.
Still undecided? This chart details all photo book options including sizes, page count, paper type and pricing.

2. Organize your photos
- Tips for organizing photos on your phone
- Tips for organizing your photos
- Gather all your photos in one place
- Scan in any old photos (make sure you scan at 300 dpi)
- Narrow down your selection, so you only upload the photos you would like to include in your photo book. This helps so you don’t become overwhelmed
- Choose a photo for the cover and organize any text you would like to include
3. Create your Photo Book
This short how-to video guides you through the steps to create a gorgeous photo book full of special touches in no time at all. Or, continue reading for a step-by-step guide.
If you choose a board book, this step-by-step guide can help guide you through the customization process.
Log in (or create!) your account at PinholePress.com. This important so that your work can be auto-saved as you go.
Select your desired photo book and choose how you would like to upload photos – our book builder can populate your book for you based on chosen photos, or you can upload the photos and start the book from scratch.
Drag and drop your photos into the gray boxes. You can double-click an image to crop, rotate and adjust the brightness of your photo.
Swap the layout by selecting the layouts tab and dragging and dropping a new layout into your book. There are many options to choose from based on photo count and orientation, as well as text.
Pro Tip: Is your cover text unreadable because of your photo? Try dropping a new layout to move your text to the top, middle or bottom of your photo book.
Add and remove pages by using the plus and minus button in the upper left-hand column. Change the order of your pages by using the two arrow buttons.
When you’ve finished your book, add it to your cart and checkout!
Pro Tip: If you don’t like the fabric color you chose when you started, you can change it in the cart page before you checkout.
Have questions or need help getting started? Send us a chat or email us (support@pinholepress.com) and we’d happy to help. We can also do complimentary custom work!